


Editors note: Still Life Photography. Recently, I was asked to write about how I create my still life images by the editors of Olympus Passion, a digital magazine devoted to photography enthusiasts who use the Olympus brand of cameras and lenses. While a bit technical in places, the article covers my entire creative process for making a still life photograph. From initial concept to final post-processing. I’ve also included many of the pictures that appeared in the article. You can find many articles about my still life images elsewhere on the website by clicking here.
Still Life Photography, an Obsession
While no one ever mistook me for an art history expert, there is an expression that suits me well, “I know what I like.” And the Dutch Master Painters of the seventeenth century are among my favorites. Artists whose techniques and craftsmanship I admire. Their attention to detail and, especially, the way they painted the light – mastery of creating light and shadow are exceptional. While I love many of the landscapes and scenes of everyday life from that era, it’s the still lifes that really captivated me.


Art museums are always on our list of must-see places to visit while traveling, especially in Europe. And the highlight of each visit for me are the Dutch Golden Age galleries. Paintings like Jan Davids. de Heem’s Still Life with Fruit, Flowers, Glasses, and Lobster would stop me in my tracks.
Of course, the inevitable happened: Why not emulate the Grand Masters style with my medium, photography. Their attention to detail, use of color, and especially, the way their mastery of painting light. In other words, try, as best I could, to fold their strengths into my own compositions.
Not quite as easy as I thought. While the camera work is straightforward, the actual creation and lighting of the still life and the post-processing are more involved.

The Studio
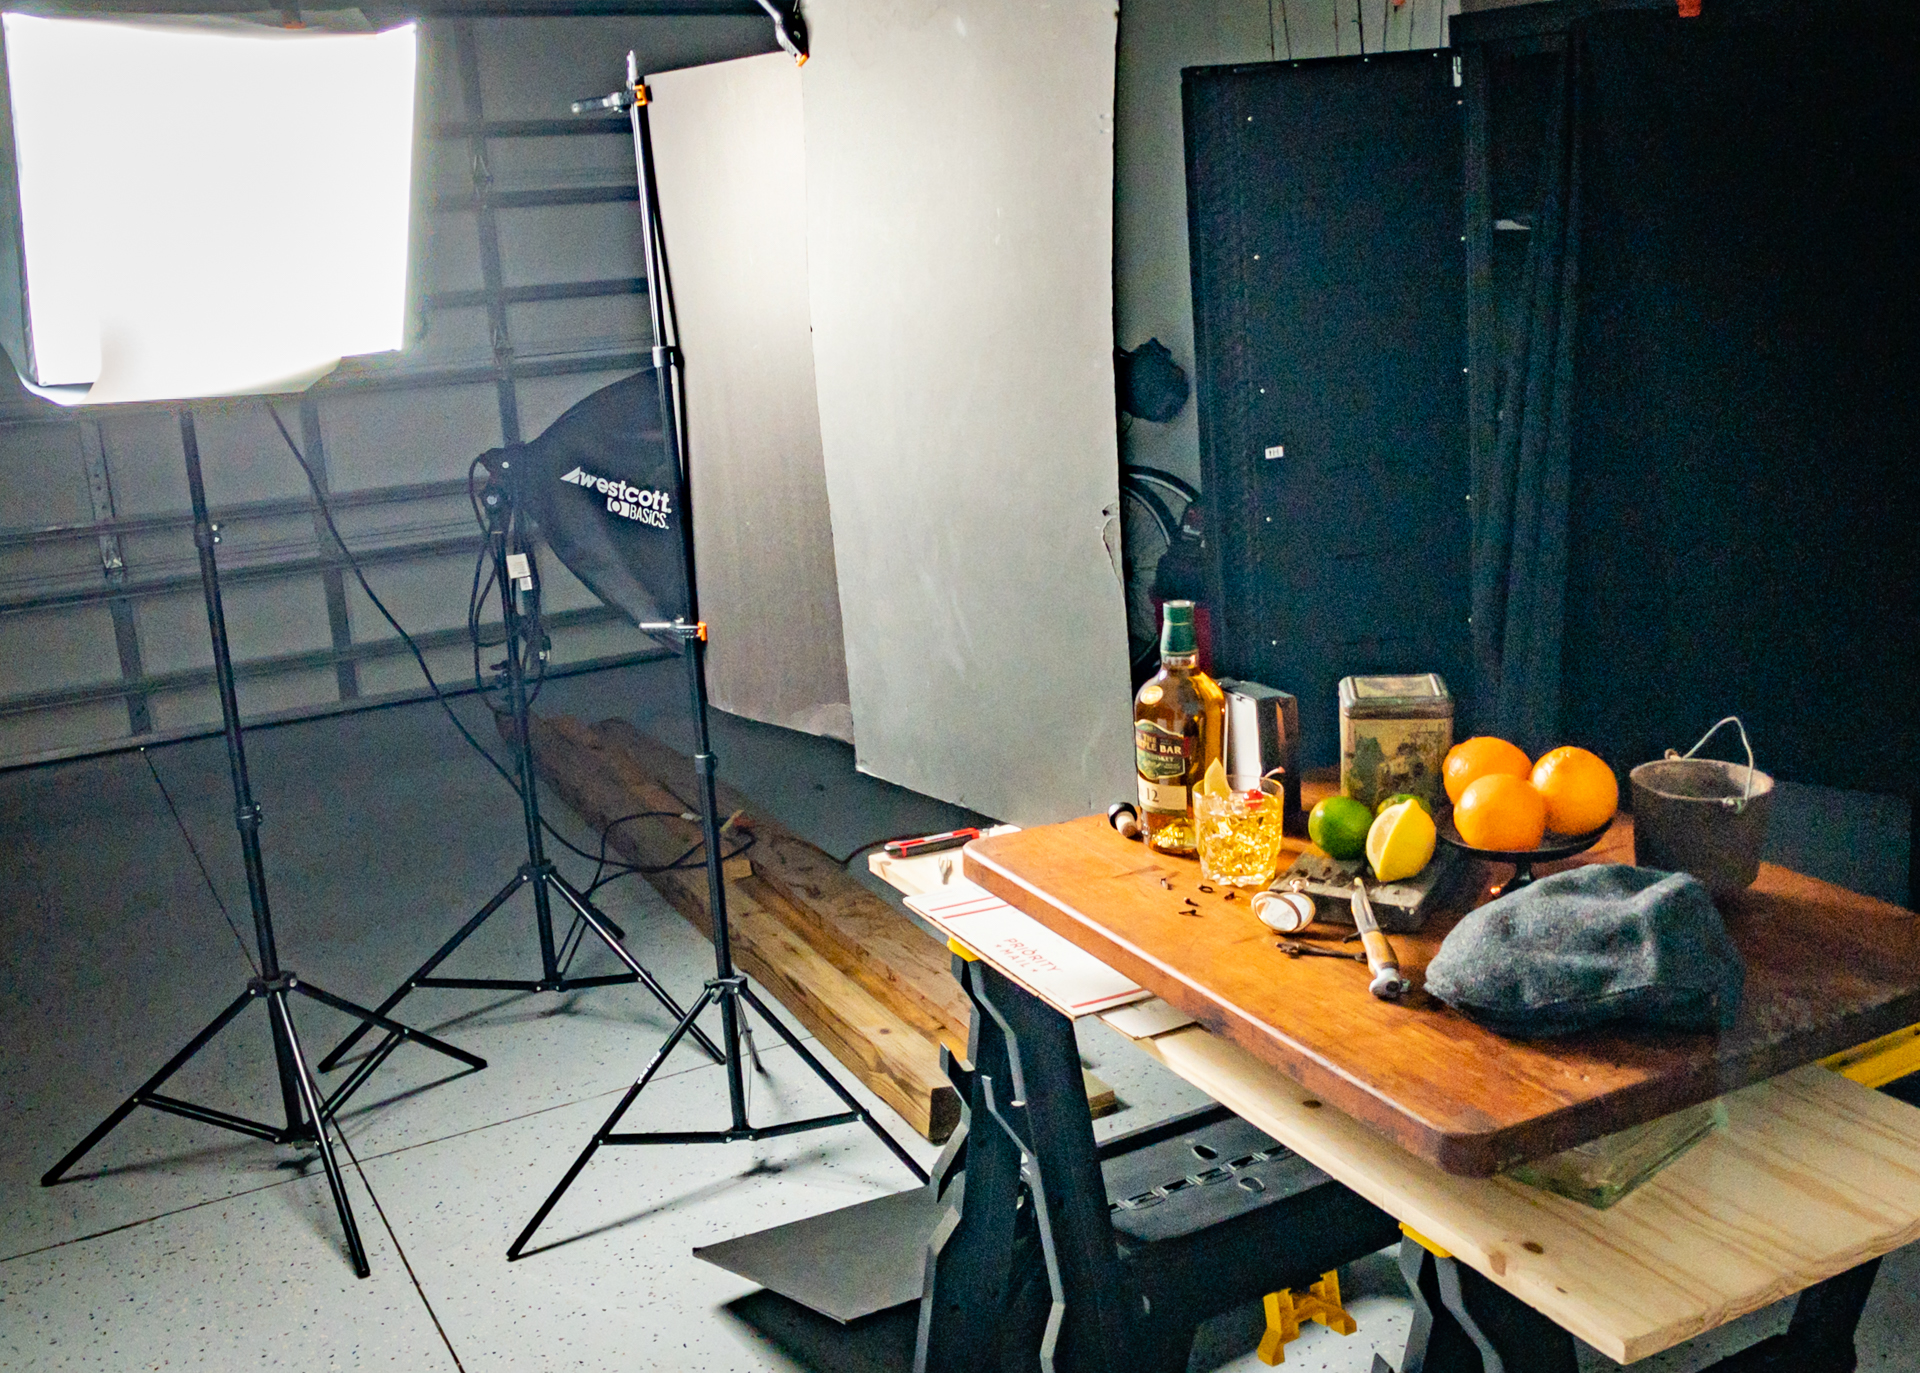
The KISS principle definitely applies to my studio. Two sawhorses, a single LED light, and a softbox, and a roll of black background paper in a corner of my garage are about it.
The Composition
Once I have the concept of my still life project in mind, and color schemes worked out, the composition is next. This is really a two-part process. Acquiring perishable items is first. Shopping the greengrocer, butcher, etc. to obtain just the right props. This often requires several stops in order to get just the right items. I am more interested in the misshapen, the blemished, the orphans. The fruits and vegetables are often left to ripen for several days. Colors deepen, while shriveling creates interesting textures.
Next, the actual composing. An appropriate surface, be it an old tabletop, a slab of weathered wood, or a fabric table cover is placed atop the sawhorses. Props that seem suitable because of shape or color or texture are arranged in my perceived composition. And then they are rearranged again and again until I am satisfied with the overall look. The thing about props is that I never have exactly what I want. Consequently, I spend a lot of time roaming flea markets, thrift stores, and the like prop hunting. Once I have the setup to my liking, I’ll often view it through my camera’s viewfinder. It helps visualize the overall composition. Once satisfied, the perishables are put in place. This is tedious and often maddening because gravity is convincing the grapes, for example, to roll on to the floor instead of staying where they had been so carefully placed.


The Lighting
Through some trial and error, I have settled on a single light source for my still life images, which closely replicates how the Dutch Masters painted light into their still lifes. The light is a 3200 lumen, daylight-balanced LED lamp in an 18-inch square softbox mounted on a light stand. I generally place the light to the left and slightly in front of or to the rear of the subject, depending on which way I want the shadows to fall. Additionally, I add a large piece of black foam core on a light stand to act as a flag or barn door to cut off the light from the rear of the set and the background. My goal is to keep the light soft but directional. Shadow is an important part of the composition by adding dimension and to accentuate texture. Smaller black or white foam core flags may be added to damp down highlights or open up shadows in portions of the composition.

Getting the Shot
When the composition is finally complete, and sometimes this can take several hours and many more hours of hunting and gathering props, it is time to get the shot. My OMD E5 m11 body and either the 12–40mm f2.8 Pro or 45mm f1.8 lens are the usual combos. They are mounted on a tripod with a remote cable release attached. After framing the still life, using the camera’s LED screen, I set the focus using manual focusing with peaking on. I select a focus point near the front third of the still life. Next, the exposure. Shooting in manual mode with iso set at 400 and aperture is set between f7.1 – 11. I expose slightly to the right using center-weighted metering on a brighter area of the setup. I may tweak the exposure using live view before I take the first test shot, which I download to Lightroom on my desktop so I can review the entire composition on the large monitor. Invariably, there are minor adjustments to be made with some of the components. Turn that stem a little to the left, tilt this to the right. Move a prop a little to open up the negative space, etc. Another test shot and any final tweaks to the setting.
I tried using Olympus Capture to tether the camera to my laptop. I realized I much preferred the big desktop monitor to critically analyze the image. Additionally, I found Capture to be clunky and not very user friendly.
Double-check focus and exposure. Ready, finally, to make the final image. That will be a single shot. Then I’ll make a five exposure +/- 2 stops HDR. Often, but not always, the Lightroom processed HDR does a good job knocking down highlights of hard or shiny objects in some still lifes.


Post Processing
Post-processing varies considerably from image to image and is done in Lightroom and Photoshop. After a file is downloaded into Lightroom, I usually start with the Auto button in the Basic window and tweak further to my liking. A little Dehaze and Clarity will likely be added here. Next, the image is opened in Photoshop. After duplicating the file, I usually make any color adjustments and add a little contrast with the curves adjustment. There are often some unwanted specks of debris, blemishes, or other distractions that are cloned out. Now, I may composite in a different background or overlay a texture depending upon the image and the look I’m after. Once saved in Photoshop, the image magically reappears in Lightroom where I will make any final adjustments, and usually a vignette.


Final Thoughts
Most any DSLR or MFT camera would work well for photographing my still lifes. The camera plays a relatively minor role in my workflow for these images. Nevertheless, I am totally committed to the Olympus system and have been for about six years. Currently, I use three bodies: OMD E1 m11 and m111, and OMD E5 m11. And an embarrassing number of lenses ranging from the 7–14mm f2.8 Pro to the 300mm f4 Pro along with several primes. I have never regretted making the switch to Olympus. The build quality of their bodies and lenses is exceptional and weatherproofing is an under-appreciated feature. We travel a lot and compact size and weight of an Olympus kit are appreciated every step of the way.

Links
Website: www.ronmayhewphotography.com
Facebook: https://www.facebook.com/RonMayhew2.0/
Instagram: ronmayhew1
LinkedIn: http://linkedin.com/in/ron-mayhew–87030843
Twitter: fotografferron